How to thread the upper thread in the machine. Bobbin for sewing machine
To start working on a sewing machine of any type, you first need to make basic settings. The most basic is threading. It is very difficult for beginner seamstresses to do this manipulation for the first time due to ignorance of the mechanism of the device. To carry out all the steps correctly, you need to know the principle of how to thread in sewing machine correctly and without disturbing the operation of the device.
How to properly thread a standard sewing machine
It is easy to figure out how to insert a thread into a sewing machine if the work is carried out on a modern device of an electrical or electromechanical type.
Example of threading on a Minerva model
Minerva is currently the most popular firm. There are many models that differ in the complexity of the arrangement, functional aspects, and the number of operations. But there is one thing in common between them - the principle of threading.
Note! Another popular company is Veritas. The principle of threading is completely identical to Minerva.
The advantage of modern sewing devices is the presence of an electric principle of operation, so the procedure for winding the bobbin and further actions. The standard filling pattern can be used in other similar models of modern production.
Installing the bobbin
The most important step is to load the bobbin. The principle of winding the thread and fixing the element (using the example of Minerva) is as follows:
 The structure of the mechanism for fixing the bobbin
 - You need to remove the removable work table. To do this, the plastic plate must be moved to the left and completely removed. On a certain model, the principle of removing the table may be modified.
- The case has a plastic door. Open compartment. Behind it you can see the bobbin mechanism that needs to be removed. Pre-raise the needle using the handwheel. To do this, just pull the “setting finger” towards you.
- Pull the bobbin out of the mechanism. Install the tool on the top pin. Pull the "yarn" from the spool to the bobbin, using special windings to hold it. Thread the thread through the hole in the bobbin to secure it completely.
- Press the pedal, having previously set the "Idle" mode. The bobbin will automatically be threaded. You can use a flywheel, but this winding principle will be long, as it is done manually.
 Fixing and filling the bobbin
It is necessary to correctly install the bobbin in the mechanism and the machine itself. Insert the device into the mechanism so that the thread is located clockwise relative to the slot. Then the bobbin element is placed in place, while you need to hold the "working finger". On most machines, the principle of installing the bobbin is made in accordance with such a mechanism.
Upper threading
The sewing mechanism of any device model is designed in such a way that 2 threads are involved in the work - upper and lower. The easiest way is to place the top one. Arrangement algorithm:
- Pull the thread, using the prompts, pull the thread through the fasteners on the body of the fixture.
- Be sure to pass the thread through the fasteners, which are responsible for the thread tension and the hole responsible for the compensation spring.
- Insert the yarn near the foot into the thread guide.
- Next, pass through the guide hook and only then thread it into the eye of the needle.
 Top threading principle
 On this stage arrangement of the upper mechanism is completed. The yarn can be inserted into the needle manually, aiming at the eye, or you can use the automatic needle threader - a special mechanism for introducing material for sewing into the eye of the needle. It is located on the left side of the foot and is adjustable with a lever.
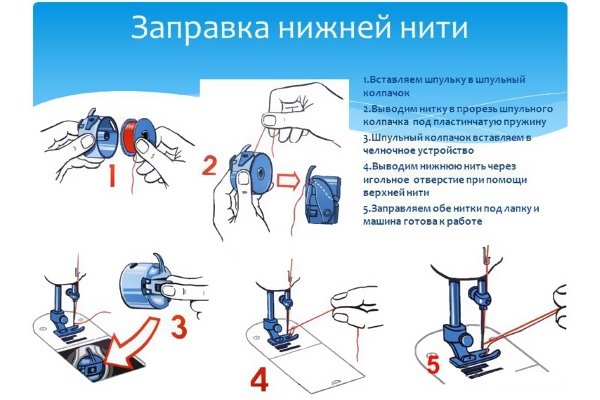
Threading the lower thread
After installing the bobbin mechanism, the introduction of yarn into work is carried out. The main thing is to correctly insert the bobbin and place the sewing mechanism in it. Next, the thread is pulled up under the foot.
 Threading the lower thread
 Switch off the device and use the side wheel to lower the needle. In this case, it is worth holding the tip of the thread threaded into the eye of the needle. Making one scroll, the top yarn catches the bottom. By pulling up on the top tip, you can pull out the material that comes out of the bobbin.
Checking if threading is correct
The correct threading option is checked in several stages. First, the location of the threads. The lower one should lie under the shoulder blade, and the upper one should be located between the teeth of the shoulder blade.
Another refueling is checked by the quality of the line. You need to take a small piece of fabric. Sew textiles with several types of stitches. If the thread breaks or is difficult to pass, then you need to adjust the mount, which is responsible for the tension of the material.
 Checking the quality of threaded thread
 It is quite simple to make a check, the procedure will not take much time and will give complete information about the device settings.
You will be interested Simple patterns and instructions for sewing shorts with a high waist
Detailed diagram: how to fill an old-style sewing machine
Older models of sewing machines have a slightly more complicated system, so threading here will be more difficult. But if you know the detailed algorithm, then there will be no problems with setting up the device. Procedures are carried out in 2 stages: top filling, bottom.
 Threading an old style sewing machine
 Additional Information! Each old model has its own thread guide route, so you need to carefully carry out the procedure without bypassing a single hook.
Scheme for setting up the mechanism:
- The needle must be in the up position. Fix the coil on the rod. Draw the thread in accordance with the route of the thread guide. Place the material under the tension regulator and push it into the spring. Use the thread guide (thread guide near the needle). Insert the material into the eye of the needle.
- Step-by-step algorithm for the implementation of the second stage. Thread the bobbin, insert into the hook. Fasten the shuttle itself to the socket, which is located under the fixture platform. Use the knob to adjust the thread tension. Pull yarn up.
Important! In the process of adjusting the tension, you need to turn the wheel in the direction “away from you”. Otherwise, the yarn will break or become tangled.
 Refueling cars with old arrangement mechanism
 To fix the result, you need to connect the upper and lower parts of the thread, wrap the ends behind the foot.
Diagram: how to thread a Singer sewing machine
Sewing machines of the Singer brand are distinguished by the complexity of the device and can be amateur sewing equipment and professional machines. Mostly at home, old equipment of this brand is used, since new samples are quite expensive.
 Fixing the bobbin mechanism in the Singer of a new sample
 note! All Singer models are divided into 2 categories: with one or two thread guides. The threading algorithm depends on the type of the “route” device.
Instructions for mounting sewing yarn:
- Disconnect the machine from the mains (take your foot off the pedal in mechanical models).
- Raise the needle to its highest position using the side wheel. Lower the presser foot onto the sewing platform.
- Fix the coil on a special pin.
- Pass the yarn through thread guide #1. Pass the fabric through the second thread guide, if there is one.
- Be sure to fix the material in the thread tension regulator.
- Pull through recess in tensioner.
- Fix in the hook the material that is located above the needle itself.
- Insert thread into needle.
According to the usual scheme, the lower thread is inserted - you need to wind the yarn on the bobbin for sewing. An automatic winding mechanism can be used as an assistant.
Possible errors in threading
It is important not only to correctly thread and start the process, but also to avoid mistakes that can aggravate the sewing procedure. Although the algorithm for mounting the upper and lower threads is simple, some flaws can degrade the performance of the device.
What to look for when assembling yarn:
- After mounting the thread, be sure to use a test piece of fabric to check the operation of the mechanism. High or low material tension can distort the shape and size of the seam.
- The material may be poorly fixed by the hook, which is responsible for the tension of the thread.
- The yarn may turn over or twist. To solve this problem, it is important to correctly adjust the tension of the material that is fixed on the bobbin.
- Incorrectly selected threads at the bottom and top of the mechanism. If you put on threads of different texture and density, the seam will be uneven and slightly deformed.
 Problems during thread installation
 You can add a few more points that will reveal the main problems, but they are quite elementary and easily detected during the assembling of yarn.
Depending on the model and “age” of the sewing machine, a more detailed principle of threading is determined. In general, the procedure is carried out in several stages: mounting the material in the upper part of the fixture, the bottom and laying the threads. It will not be difficult to thread a thread in accordance with the route - all stages in modern models are almost completely automated. Old samples are more complicated in terms of automation, but are easy to "train".
A complete process of working on a sewing machine, regardless of experience with this device, is impossible without its correct settings, which are performed manually. So, in this material we will consider detailed diagrams of how to properly fill a sewing machine.
General instructions for refueling a sewing machine
The general instructions for refueling a sewing machine look like this:
- Wind the thread with which you will work on the bobbin and at the same stage put on the upper pin on the spool for the upper thread.
- The next step is to thread the upper thread in the sewing machine. For this process, there is usually an instruction on the instrument case. The upper thread is the one that is pulled from the spool into the eye of the needle. Before threading through the eyelet, raise the presser foot and set the needle so that it is at the very top.
- Check thread tension. Modern devices have special tension regulators.
- After threading the upper thread, you can thread the lower thread. To do this, turn off the drive (moss wheel) and insert the bobbin into place. After that, you need to turn on the wheel and turn it until there is enough thread on the bobbin.
- Insert the bobbin case into the bobbin, making sure that the bobbin pin aligns with the bobbin slot. If everything is done correctly, a characteristic click will be heard.
- The thread must be brought out through the valve plate, close it. The upper and lower threads must be connected and brought back by the shoulder blade.
To check the correctness of the work done, you should scroll the flywheel. After the needle rises and falls, a loop of the bottom thread should form from the hole in the plate on the upper thread.
To understand how to thread a bobbin into a standard-type sewing machine, we recommend watching a video tutorial that tells not only about the sequence of actions, but also about where the bobbin is located and what nuances you should pay special attention to:
Correct threading order
This process will vary depending on the type of machine. Modern devices have detailed instructions on how to properly thread a sewing machine, and the devices themselves are designed in such a way that you can intuitively guess how to do everything. But with rotary-type machines, difficulties arise, so we will present two instructions in detail:
Top threading
- Pass the thread from the spool through the mount at the body of the device.
- Thread the thread into the thread tension regulator and bring it into the compensation spring, which looks like a hook.
- Pass the thread through the hole in the thread guide, bring it out through it and pass it into the existing fastening, then into the eye of the needle.

In some models of machines, instead of a thread guide, there is a fork. IN this case you just need to put the thread on this fork, and not thread it into the hole.
Threading the lower thread
- Wind the lower thread not on the spool, but on the bobbin.
- Insert the bobbin into the bobbin case, while the thread should be tucked under the spring plate.
- Check thread tension. A certain tension is set for the model of the machine.
How to thread a twin needle?
If the machine sews a zigzag stitch, then a double needle can be installed in it. In this case, the threads will be threaded into the needles in the same way as if it were done with one needle, the only difference is that an additional - second - spool is required. In this case, both threads must pass through the same upper thread tensioner.
Instructions on how to thread two needles into the machine:
- A double needle is installed in the same way as a regular needle. The cut of the needle should be directed away from you, and the round side of the needle bulb itself should be directed towards you.
- The threads from both spools must be passed through all the thread guides, not forgetting the upper thread tensioner. It should turn out that the lowest thread guides will separate them.
- The left thread must be threaded into the needle on the left, the right thread, respectively, into the needle on the right. If the device has one thread guide, then the left thread must be passed through the thread guide, and the right thread next to it, tucking it under the eye of the needle.
It is not difficult to use a double needle, the main thing is to thread both upper threads correctly, as well as loosen their tension (in the bobbin itself). The lower thread will be used when sewing at the same time as the upper thread, thereby forming a zigzag, so it is imperative to loosen the tension.

The twin needle makes it easier to sew double stitches on the machine, as well as to sew decorative stitches with just one twin needle stitch.
Manual sewing machine: how to thread
When setting up a manual machine, it is important to choose the right needle and thread number for a particular type of fabric, as well as adjust the thread tension, otherwise the quality of the stitch will suffer. Otherwise, refueling a manual sewing machine should not cause difficulties, as can be seen from the instructions for refueling the Chaika machine:
- Turn the handle so that the mechanism that attracts the threads is at the top.
- Insert the needle into the holder until it stops. The flat side should be facing towards the pin that the foot is on.
- Use the screw to secure the needle.
- Install the spool of thread on the rod intended for this.
- Pass the thread through the friction washer and thread guide.
- Insert the thread into the thread guide, fix it in the needle holder.
- Pass the thread through the eye of the needle (this will be the upper thread).
Threading the lower thread:
- Wind the thread onto the bobbin.
- Insert the bobbin into the cap. The thread should be outside.
- Insert the cap back until a characteristic click sounds.
- To tighten the thread, you need to turn the handle of the machine to tension.
- Tuck both threads (top and bottom) under the foot.
How to properly adjust the thread tension:
- Use the screw that is on the bobbin case. The tighter the screw is tightened, the tighter the thread is.
- Adjust the tension using the adjuster, which is located at the lever that raises the foot.

A few useful rules for using the Seagull machine:
- Without a pre-lowered needle under the foot, the line cannot be started.
- The handle of the machine turns strictly “towards itself”, it is impossible to change the direction of rotation.
- To work on this machine, you need to choose those fabrics that are suitable for all types of stitches, otherwise you can ruin not only the fabric, but also bring your machine into complete disrepair.
Video: How to fill the Podolsk manual sewing machine?
Another old machine that grandmothers had at home is a device of the Podolsk brand. Despite the fact that such a model is old and manual, it is pleasant to work with it if you understand all its mechanisms and learn how to refuel, which will help the following video:
In order to enjoy work, as well as avoid problems during work, it is worth thoroughly studying the instructions for refueling the sewing machine, because not only the quality of the sewn product, but also the life of the device will depend on this.
In contact with
The tension of the bobbin thread, the quality and thickness of this thread, the correct threading of the bobbin into the bobbin case, all this affects the quality of the stitching of the sewing machine.
In this article, you will learn the important nuances of the correct operation of the most important assembly of the sewing machine - the bobbin case and the bobbin.
Video on how to wind a thread on a bobbin using a sewing machine winder.
Which bobbin to choose for your sewing machine?

During stitch formation, the upper thread pulls the bobbin thread out of the bobbin case. Both threads are intertwined inside the parts to be sewn, and a stitch is formed, from which a line is formed.
An important factor affecting the uniform and smooth pulling of the lower thread is its weight and the material from which the bobbin is cast. By the way, do not confuse the bobbin with the bobbin case, the bobbins are shown in this photo, and the bobbin case is the device where the bobbin is inserted.
Naturally, a plastic bobbin will slide much easier inside the bobbin case, providing an even and smooth thread pull, and its weight will be noticeably lower compared to a metal one.

Also, not all bobbins are interchangeable. This photo shows three types of bobbins. The leftmost one is designed for most household sewing machines. The bobbin in the center is used in an old-style Japanese household sewing machine Brother. The rightmost bobbin is for industrial sewing machines such as the 1022 class sewing machine.
Always take a sample with you when buying a new bobbin.

The bobbin case is the most important part of the sewing machine, which must always be in perfect condition. The surface of the bobbin case should be mirror-like, at least clean, free of rust and oxidized areas. The slightest notch on the surface of the bobbin case or a chip in the wall will cause a variety of stitch defects, ranging from looping stitches and skipped stitches to thread breakage.

Regardless of the type of sewing hook, each of them has an adjusting screw. It is best to unscrew it with a small flat screwdriver, which is available in the tool kit of any sewing machine.

It is necessary to adjust the tension of the lower thread as little as possible, since the slots of the screwdriver can “break” the slot of the screw and notches will appear, which will cause the thread to break and other defects.
Also, do not unscrew this screw more than half a turn, as the screw may pop out and get lost.

You can check the correct tension of the lower thread as follows.
Insert the bobbin into the bobbin case, pull the thread out of the case and pull it as shown in the photo. The thread, when twitching, should come out under the spring of the bobbin case in jerks.
How to improve the sliding of the bobbin inside the cap

If you have an old machine or a sewing machine that has stood for years without being used in the pantry, then the inside (bottom and walls) of the bobbin case will rust or oxidize. As a result, the machine will constantly tear the thread, sew with gaps, etc.
To correct this defect, you can cut a gasket from a stationery plastic folder and lay it on the bottom of the bobbin case.

Circle the outline of the bobbin with a simple pencil and cut out the outer outline of the gasket with scissors.

The inner hole of the gasket is cut out with miniature nail scissors.

By the way, instead of plastic, you can cut the gasket out of tissue paper, tracing paper, etc. To improve the sliding of the bobbin, it is recommended to oil the paper lining.

The gasket should freely, without effort, fit into the bottom of the bobbin case.

It is necessary and possible, but very, very rarely. Basically only after a long standing in the pantry or in the garage. By the way, never store a sewing machine in a garage. Moisture and temperature changes will quickly do their job and turn the machine into a set of rusty parts.

Follow a simple rule when using a thick upper thread, bottom thread on the bobbin wind on the number thinner. If the thread is standard, then this rule does not need to be applied.

A lot of factors affect the quality of the line, including the uniformity of winding the thread on the bobbin. This is exactly what the hole on the wall of the bobbin is intended for, for threading the edge of the thread before winding it on the winder.

Please note that the thread on the bobbin must match the position of the spring.

"Small", but it can also affect the appearance of looping of the upper thread in the stitch stitch.

Hold the latch on the bobbin case and hook the bobbin case into the hook.
Hold it down thumb bobbin case until a specific click appears.

Your daughter's favorite toy will be the tilde doll, which you will sew with your own hands. How to make a pattern and sew a soft fabric doll.
If the needles constantly break during the operation of the sewing machine, then this is a sign that there is a serious failure and you will need to contact the master. Breaking, the needle can damage the walls of the bobbin case, ruin the bobbin and even break the needle plate. True, sometimes the reason can only be the inability to work on a sewing machine or the habit of pulling fabric with your hands.
This is the most common defect for Seagull-type sewing machines. This happens, as a rule, for several reasons, one of which is a bad bobbin. Try to buy a new plastic bobbin and replace the "native" one with needle-worn edges.
The bobbin case and bobbin are directly involved in the looping process. And the quality of the resulting line depends on their condition and adjustment. But not only these details affect Good work sewing machine, without thread breakage and gaps. Read more in this article.
What sewing machines are used to sew knitted fabrics. What is a flat or cover stitch, and how to sew knitwear on a conventional sewing machine.
There are several ways to process the bottom of jeans. In this article, you will learn how to restore a frayed bottom of men's jeans.
The sewing machine will not sew if the handwheel friction washer is not installed correctly or bushings, etc., have rusted during long periods of storage.
If you are reading this article, then you probably bought a sewing machine and are puzzled about how to thread a sewing machine. Do not get upset for nothing, today I will teach you how to do it step by step, as well as give a useful life-hack that only experienced seamstresses know, and it will allow you to do this process one, two, or three.
In fact, how you fill your sewing machine will determine how well it will sew in the future. Even the coolest cutting edge sewing machine will loop and skip stitches if threaded incorrectly. So treat this process with all responsibility and care.
How to thread any sewing machine
Unlike an overlocker, a sewing machine has two types of thread feed - these are upper and lower. And each of them is regulated separately, but more on that later. If you look closely at your typewriter, you will see that there is a metal rod on top of its body - this is a holder for a spool of thread. They usually have an adjustable structure, if you put the sewing machine after sewing in a storage place, such as a closet, then the rod needs to be lowered down. And when working, respectively, raise up.
Next to the spool pin is another rod, but with a hole in the body - this is the needle threader. It is needed so that the thread does not get tangled when sewing and rotating the spool.

Also on the body of the sewing machine, to facilitate the process of threading, there are symbols with numbers. In the future, you can look at these tips and remember how to refuel the machine. So let's get started. First you need to take the coil of the desired color.
How to thread the bottom thread
1. And I'll start with bottom filling. To do this, I take out the bobbin case with the bobbin inserted into it from the sewing machine. Your sewing machine may have a horizontal hook, but in both types of machines, the bottom threader has a bobbin case and a bobbin. So there is no big difference in how to thread a sewing machine with a horizontal or vertical shuttle.
Now you need to wind the amount of thread necessary for sewing on the bobbin. In this case, be guided by the volume of sewing. If you will be sewing a lot, then you need to fill the bobbin with thread to the brim. If you need to make a couple of lines, less than half the bobbin is enough.

2. I pull the flywheel away from the sewing machine.

3. I place the thread on the spool pin, pass the thread through the thread guide, thread the end of the thread through the hole in the bobbin and wind the thread by hand for the time being, making three or four turns.

4. After I have fixed the thread on the bobbin case, I install the cap on the winding spindle and take it towards the flywheel. Now you can turn on the sewing machine, press the pedal and the thread will start to wind on the bobbin.

5. After I have wound the required amount, I stop the flywheel. I move the spindle away from the flywheel, cut the thread, remove the bobbin from the spindle)

How to thread the upper thread
6. Turn the handwheel until the thread take-up (4) rises to its highest point.
I draw the thread according to the scheme - first through the needle threader (1), the thread guide (2). Then I draw the thread in a zigzag pattern around thread guides 3 and 4, while threading the thread into the eye of thread guide 4.

7. I pull the thread down and pass it through the thread guide (5), then through the needle thread guide (6) and the last step is to thread the thread through the eye of the needle.
ADVICE. In order for the thread to quickly pass into the eye of the needle, you need to cut the tip of the thread with scissors at an angle.

Pulling up the bobbin thread
8. I insert a bobbin with a wound thread into the hook. I raise the presser foot with the lever located on the body of the sewing machine.

I hold the upper thread in my hand and with the help of the flywheel, I begin to slowly lower the needle down. After the needle has made a turn and comes to the surface, pull the upper thread. I see how the thread made a loop, and captured the lower thread. All I have to do is bring it to the surface.
ADVICE. So that both threads do not run away during sewing, you need to pull them out to a distance of 15 cm and pull them back.

Now you know how to thread a sewing machine and this process will not cause you problems when sewing.
How to quickly thread a sewing machine
And now the promised lifehack from a sewing expert. If you need to change the threads - do not rush to remove the previous spool. Unwind it a little and cut close to the spool. Then tie this piece of thread with a knot to the spool on which you are going to sew. And now you can pull the tucked piece of thread through the needle, and it will pull a new thread with it. Which will easily pass through all the thread guides. It remains only to cut the thread with a knot and thread a new thread into the eye of the needle.